How to gain access to your Windows account if you lose your password

Monday, 7 April 2014


Bypass Windows security with the hidden administrator account


If you're using a single account, it's surprisingly easy to lock yourself out of your own computer by losing your password. Luckily, its just as easy to get back in again without leaving a trace – so long as you haven't misplaced your Windows Installation DVD. Here's how.
In terms of PC disasters, few problems are quite as notorious at ruining your day like losing your Windows password. When password hints prove to be flimsier than expected and there's a distinct lack of any alternative user accounts, trying to log in to your PC often degenerates into a frustrating exercise of trial and error – while typically never exceeding the latter part. More often than not, common approaches to this problem tend to be fairly elaborate and usually involve creating boot disks with password bypass tools or an independent Linux OS. If your Windows Installation DVD is within reach however, or if you are using Windows XP, there's no need to bother with any of that. Here's how to infiltrate Windows' defences and reset your password without third party tools.


Resetting passwords in Windows XP

The easiest way to regain control of your system makes use of the hidden Windows administrator account, which conveniently comes unprotected. With its help, you can make sweeping changes to your system and override most of your previous settings, including user passwords. Though it is disabled by default for security reasons, getting access hardly poses a problem in Windows XP (excluding the Pro version). Here's how you do it:
1. Restart Windows in safe mode. To do so, reboot your PC and tap F8 a couple of times right after the BIOS initialization screen has passed. If you are unsure when that is exactly, you can also employ the advanced technique of tapping it continuously and in quick succession throughout the whole booting process.
2. This will bring you into the Windows boot menu. Choose the option “Safe Mode with Command Prompt”.
3. Ideally, you should be offered an “Administrator” user account in the login-screen by default. If not, try hitting Ctrl + Alt + Del twice to bring up a user name prompt, type in “Administrator” without a password and hit enter.
4. Inside of the Windows safe mode UI, you should now see a command prompt. Enter to line "net user" to get an overview of all active accounts on your system. Note down the name of the user account that you lost access to, and use it in the commandnet user [username] [password]to assign a new password to it. This could look like this: “net user Martin 123456”.
5. Restart your PC and log into your account with your new password.

Resetting passwords in Windows Vista, 7 and 8

Just like in Windows XP, you can gain circumvent Windows' security measures with a hidden administrator account. Unlike Windows XP however, Microsoft has since fixed its rather blatant vulnerablility in safe mode, so that the administrator account can't be reached quite as easily any more. This is where the Windows Installation DVD comes into play (make sure that it isn't simply a Recovery DVD, as that won't suffice). With it, you can navigate to the administrator account without ever setting foot into Windows itself. Note that this method unfortunately requires modifying the registry and can thus be rather intimidating at first. If you follow our instructions carefully however, you should be on good terms with Windows again in no time. 

  • 1 .Start your PC with the bootable Installation DVD of Windows. If you have not already done so, make sure to adjust your boot priorities in the BIOS, so that your CD/DVD/Blu-Ray drive has priority over your hard drive.
  • 2. In the first menu, select your installation language and click on “Next”. In the following window, click on “Repair your computer”.
  • 3. The set-up assistant will now search for Windows installations and list them up. Choose the one that applies to you and proceed to the next window. Continue by clicking on “Command Prompt” continue to the more in-depth part.
  • 4. Enter “regedit” into the prompt and hit enter. This will open the Registry Editor, which isn't yet connected to the registry of your installed version of Windows. To remedy that, select “HKEY_LOCAL_MACHINE” on the left, and navigate over “File” > “Load Hive”. Enter the line “%windir%\system32\config\sam“ into the field “File path“ and click on “Open” to load the user and password information manager of Windows (alternatively, you can also manually browser to your Windows folder and select the SAM file). The Registry Editor will then demand a name for the new hive, which can be anything you like. Just make sure to remember it for the following step.
  • 5. Head to “HKEY_LOCAL_MACHINE > [Your new hive] > SAM > Domains > Account > Users > 000001F4”. Turn your attention to the right panel, where you will find an entry simply called “F”. This is where we will activate the administrator account for Windows. Double-click it to summon an hexadecimal editor with a bunch of neatly arranged numbers.


  • 6. Look for the line that starts with “0038” on the left side. Directly next to it (to the right), you will find the value “11”. Double-click it and overwrite it with “10” to activate the administrator account. Be advised that it's important not to change anything else, as Windows might be rendered inoperable otherwise. Don't worry - if something does go awry, just click on “Cancel” and try again. Otherwise, click on “OK”.
    7. Close the registry editor and the command prompt and reboot your PC without the Installation DVD. If everything has worked, you will now find a new administrator account to log in to in the welcoming screen.
    From here on out, unlocking your own user account is a breeze. Log in to the admistrator account, summon your command prompt up again by clicking on the Windows-Symbol in the bottom right corner of the screen and search for “cmd”. Right-click the tool in the search results and select “Run as Administrator”. Enter the command
    net user [your account name] [your new password]

    Tip: It is advisable disable to administrator account again after it has fulfilled its purpose, as its unprotected, yet powerful nature can pose a serious security risk. To do so, log into your own account, open the command prompt with administrative rights again, and enter
    net user administrator /active:no
    Alternatively, you may hold on to it, but equip it with a password by entering
    net user administrator [password]
    In either case, restart you computer for the changes to take effect.

    How to Enable / Activate Hidden Administrator Account in Windows


    Many people ask me why there is no built-in Administrator account available in Windows Vista,Windows 7 and later OS versions? Why can't we use the default Administrator account? The answer is "Yes! The default Administrator account is still created in Windows Vista and later OS but its disabled by default for security purposes."
    Many times you might want to enable it for troubleshooting purposes or to get rid of the annoying UAC prompts while tweaking your system. So here I'll describe a few methods to enable and activate the hidden and built-in Administrator account in Windows Vista, Windows 7 and later OS versions:
    Method A:
    1. Right-click on My Computer icon on Desktop and select "Manage", it'll open "Computer Management" window. ( You can also open it by giving "compmgmt.msc" command in RUN dialog box or Start Menu Search box).

    2. Go to "Local Users and Groups -> Users" section. In right-side pane double-click on "Administrator" account. It'll open its Properties window. Uncheck "Account is disabled" option and Apply it.
    Method B:
    1. Type "secpol.msc" in RUN dialog box or Start Menu search box, it'll open "Local Security Policy" window.
    2. Go to "Local Policies -> Security Options".
    3. Double-click on first option "Accounts: Administrator account status" and select "Enabled" and apply it.
    Method C:
    1. Click on "Start button -> All Programs -> Accessories". Right-click on "Command Prompt" and select "Run As Administrator". If you are prompted to enter password, enter the password and continue. You can also open Command Prompt in Administrator mode by typing "cmd" in Start Menu Search box and press "Ctrl+Shift+Enter".
    2. Now provide following command:
    net user administrator /active:yes
    3. That's it. The Administrator account will be enabled. If you want to disable it again, simply replace "yes" with "no" in above command.
    NOTE: Never activate the hidden Administrator account until required. Its better to use other general accounts for better security. Also the Administrator account has no password, so if you enable it then don't forget to set a strong password for it.

    How To Install Windows XP from USB Flush drive

    Saturday, 5 April 2014


    Installing Windows 7 from a USB drive is easier as you can simply make the installer USB drive. But what if you want to install Windows XP from USB drive? It is not so easy as like as you did for the Windows Vista, 7 or Windows 8. To install XP from a removable drive, you need to follow some advanced steps. Because, Windows XP does not have the ‘boot from USB’ drive feature. But, you can still setup Windows XP in your computer using a USB or flash drive by following this simple how-to guide.
    Installing any operating system from a removable drive is always useful. Especially, if the CD or DVD-ROM of your computer does not work properly then this is a handy way to get your computer installed with XP.
    When you insert the installer disk in your CD/DVD-ROM, the machine detects it and prompts for “Press any key to boot from cd”. By then, you can format the hard disk, make the partitions and then you can install the operating system in your system.
    The same thing does not happen with you if you just copy the content of a Windows XP installer disk into a USB drive. You need to make your USB drive bootable. Here, in this article, I’ve discussed the best way to install Windows XP from USB or flash drive step-by-step.

    How To Install Windows XP from USB Flush drive

    1. Firstly, download the software Win to Flash which does not need any installation. Just double-click the setup file and the following screen appears.


    2. Head to the ‘Task’ tab and choose your task as the following.
    Choose the Task type as “Transfer Windows XP/2003 setup to flush” from the drop-down. Click the ‘Create’ button.
    Install Windows XP from USB Setup Transfer
    Click the ‘Next’ button to continue.
    Install Windows XP from USB drive
    3. Select the source path of the Windows installation disk. Or, locate the path of the copy that is dumped at your hard drive as well as the path of your USB flash/pen drive.
    Windows XP Source Path
    4. Click the ‘Next’ button and wait until the bootable copy is prepared into your USB Flash drive.
    Once completed, you can start installing Windows XP. It is a pretty easy to install the Windows XP from that USB drive. Just boot your computer from that USB stick. To do that follow the steps below.

    How to boot your computer from the USB drive

    • Press the F2 key ( or the DELETE key, it varies with the brand of your computer mother board) to enter into the BIOS settings.
    • Head to the “Boot” menu and set the boot preference for the Removable disk as “First”.
    • Save the setup and exit by pressing the F10 key.
    Bios settings to install windows XP from USB drive
    Now your computer should boot from the USB/pen drive.

    Hope this helps to setup Windows XP in your desktops or laptops which do not have CD or DVD drive. You can just do it from a USB drive.

    How to trace any mobile number in the world

    How to Trace any mobile number in the world.

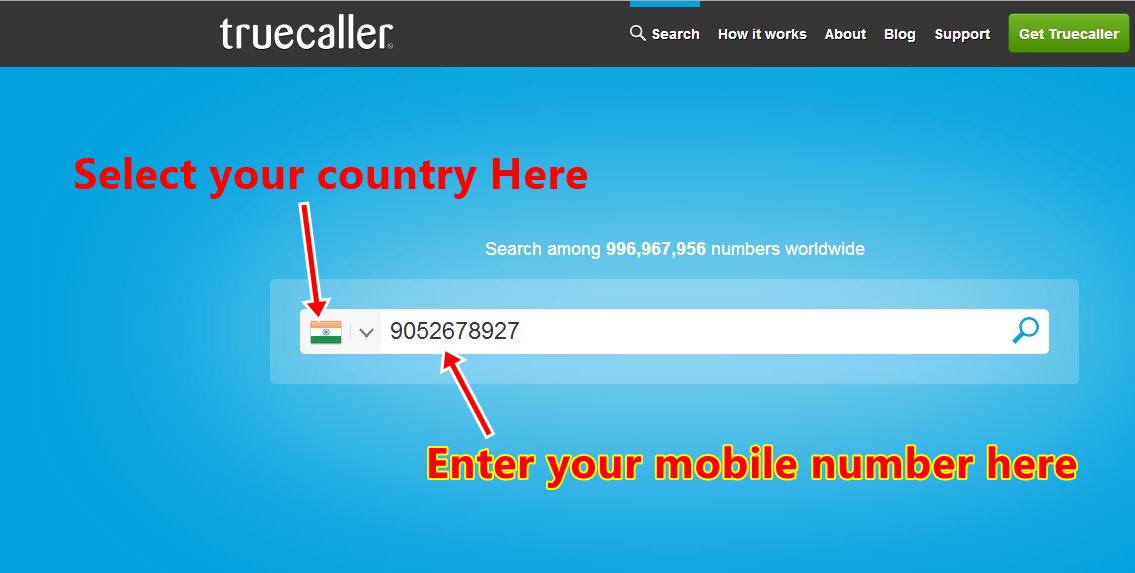
    1. Just go to the official website of TRUE CALLER.
    2. Enter the mobile and select your country from the list present there and click on search button.
    truecaller+mobile+number+trace

    3. It will ask you to login in to any of the social networking site, select Facebook and allow access for that application.
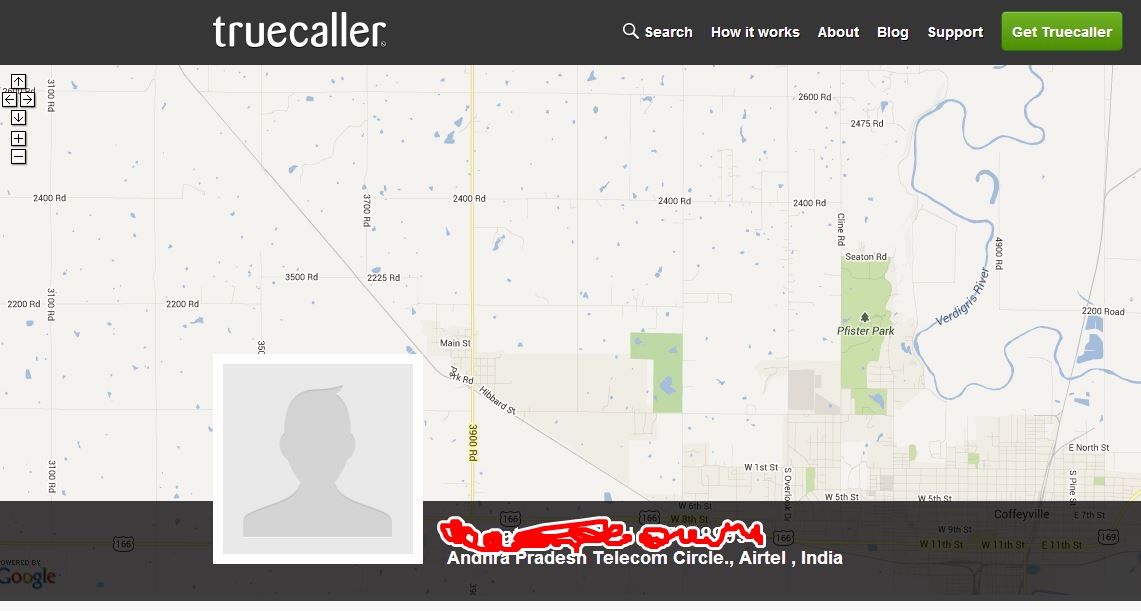
    4. It will show you the details of the number. You can try as many as number you want just for free J

    truecaller+mobile+number+trace

    How to trace mobile numbers on ANDROID.

    True caller application is also available for ANRIOD, by installing this application to make your searched easy, it will also let your know about the details of those mobile numbers whenever you get a call or message from any number.
    You can download the TRUE CALLER on ANDROID from the below link


    Final words:

    This is the only application or website that can give you the details of the mobile numbers from around the world. None of the other apps works, as I said previously they just trace the network name and state. You can get the complete details of the Mobile numbers user only from by contacting the Network providers. For security reasons they won’t let others to know about the details except under extreme conditions . Hence TRUE caller is the best solution for all of us. In coming days its mobile directory even better, so that we can get info of lots of users.

    Thanks !!

    HOW TO SHARE REMOTE SCREENS AND CONTROL PC WITHOUT ANY SOFTWARE IN WINDOWS


    Remote sharing is nowadays on its peak, people use remote sharing to provide live support or for sharing screens. Most of us always use third party software's for sharing or controlling remote systems using software's like Teamviewer or Radmin etc.  Today i am going to teach you guys how to connect any two or as many as windows PC through remote without using any third party tool like team viewer etc. So lets learn how to share screens without any third party tool.


    Windows Remote assistance without any external software
    Windows Remote assistance without any external software


    As we all knows Windows OS is  full of hidden programs that are only limited to developer or geeks. Today we are going to learn about MSRA (windows remote assistance) executable. MSRA is windows inbuilt remote assistance program using which you can control remote pc's, share remote screens, provide remote support and much more. Lets learn how to use MSRA for remote sharing.

    Steps to Share or Control Remote PC using MSRA:

    1. First of all click on startup and type command "MSRA" and press enter as shown below:


    Type msra in search option
    Type msra in search option

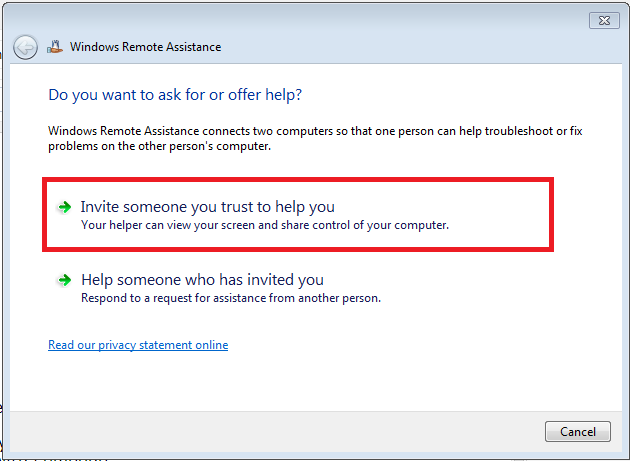
    2. Now you will see screen like below having title "Windows Remote Assistance" , there are two options displayed:

    • Invite someone you trust to help you : Choose this option if you want to share your screen with someone.
    • Help someone who invited you : Choose this option if you want to control someone others PC remotely.


    Click on Option a "Invite someone you trust to help you" to share your screen:


    invite someone to provide remote assistance
    Select shown option to continue

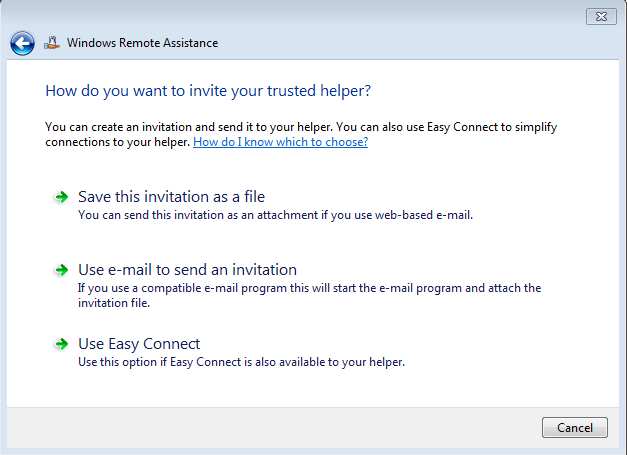
    Once you click the above option then you will see below panel with multiple options:


    Options displayed for Windows remote assistance
    Options displayed for Windows remote assistance

    Now you can see three different options :

    • Send this invitation as file : On clicking this option you can save the invitation file and send it to anyone from which you require help. After saving the file another window will open containing the password. You have to provide that password to person whom you want to connect to your machine.
    • Use email to send an invitation: You can send invitation directly via email but it requires email client on your machine to send email like outlook etc.
    • Use Easy connect: Another method to directly connect two PC is using Easy connect but this require some basic settings at your routers end i.e. If the computer has IPv6 disabled or is behind a NAT router that blocks Teredo traffic, the Easy Connect option will be unavailable.


    Now once you have send the  remote assistance invitation file to user, he can connect to your PC by double clicking the invitation file and then entering the password.

    Note: You need to enable remote assistance service.

    3. Help someone who invited you : By clicking this option you can provide help to anyone who has done the above task. You will need two things : Invitation file and password to connect remote PC.


    Woohooo... Did you know there is another smart option by which you can directly connect to any PC using IP address? If not, well lets learn that too. Yup we can also provide windows remote assistance support using IP address too. Here are options.

    1. First of all click on startup and type command "MSRA" and press enter.
    2. Now you will see screen where two options are displayed, Select "Help someone who invited you".
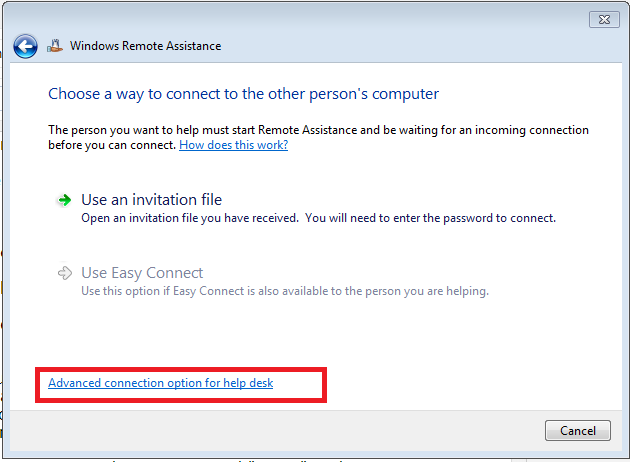
    3. After that you will see some option, click on the bottom one "Advanced connection option for help desk" as shown below :


    Select advanced connection option for help desk
    Select advanced connection option for help desk
    After clicking option you see below panel to enter IP address:


    Enter IP address or computer name


    After entering IP address press Next to connect to IP address. That's all.

    Hope you all enjoyed the learning. If you have any queries ask me in form of comments.
    Copyright @ 2014-16 Latest Tech Tricks Everyone Should Know | Imhacker. Designed by Imhacker

    Total Pageviews

    About Imhacker

    Follow us on Facebook